Imaginez votre jardin ancré dans un bassin lisse comme un miroir, avec des cascades murmurant en arrière-plan, des koïs glissant dans une lumière scintillante. Vous pourriez revêtir ce bassin de caoutchouc EPDM ou de béton coulé, mais si vous souhaitez une surface qui ressemble à une seconde peau sans joint, qui résiste aux UV et qui ne gonfle pas sous l'effet des racines des arbres, la polyurée est la solution moderne. Dans cette présentation, nous aborderons tout, des croquis de conception à l'introduction sécurisée des poissons, en montrant précisément où les pompes, filtres, éclairages et fontaines solaires prêts à l'emploi de Poposoap s'intègrent pour transformer une excavation brute en un écosystème vivant et facile d'entretien. Vous comprendrez ainsi pourquoi de plus en plus de professionnels et de bricoleurs construisent un bassin à koïs en polyurée plutôt que de se battre avec des bâches à joints.
Pourquoi choisir la polyurée pour votre bassin à koï ?
La polyurée est un élastomère bicomposant pulvérisé à haute pression. Lorsque les jets atteignent la paroi du bassin, ils fusionnent en quelques secondes, formant une membrane continue, semblable à du caoutchouc.
- Zéro couture : aucun joint collé ne se détériore avec le temps.
- Allongement extrême : se dilate et se contracte en fonction des variations de température, idéal pour les régions qui gèlent et dégèlent.
- Inertie chimique : Totalement sans danger pour les poissons une fois durci ; il ne craie pas et ne s'infiltre pas.
- Adhère à tout : adhère au béton, à l'acier et même au bois, vous permettant ainsi de concevoir des bords créatifs sans plis de doublure.
Étape 1 : Planifiez l'aménagement de votre étang

Commencez par la fonction : les koïs ont besoin de profondeur (90 cm ou plus) et d'une circulation douce. Dessinez l'empreinte et marquez l'emplacement du kit cascade Poposoap : un déversoir préformé, une pompe et un ensemble de plomberie délivrant 660 gal/heure de refoulement dans un déversoir de 8 ou 12 pouces. Placez la cascade face à la prise d'eau de votre écumoire ; cela crée un courant lent et aérodynamique qui emporte les débris vers le filtre.
Conseil : déterminez dès maintenant les pénétrations de plomberie ; la polyurée adore encapsuler les brides de cloison, les rendant ainsi étanches à vie.
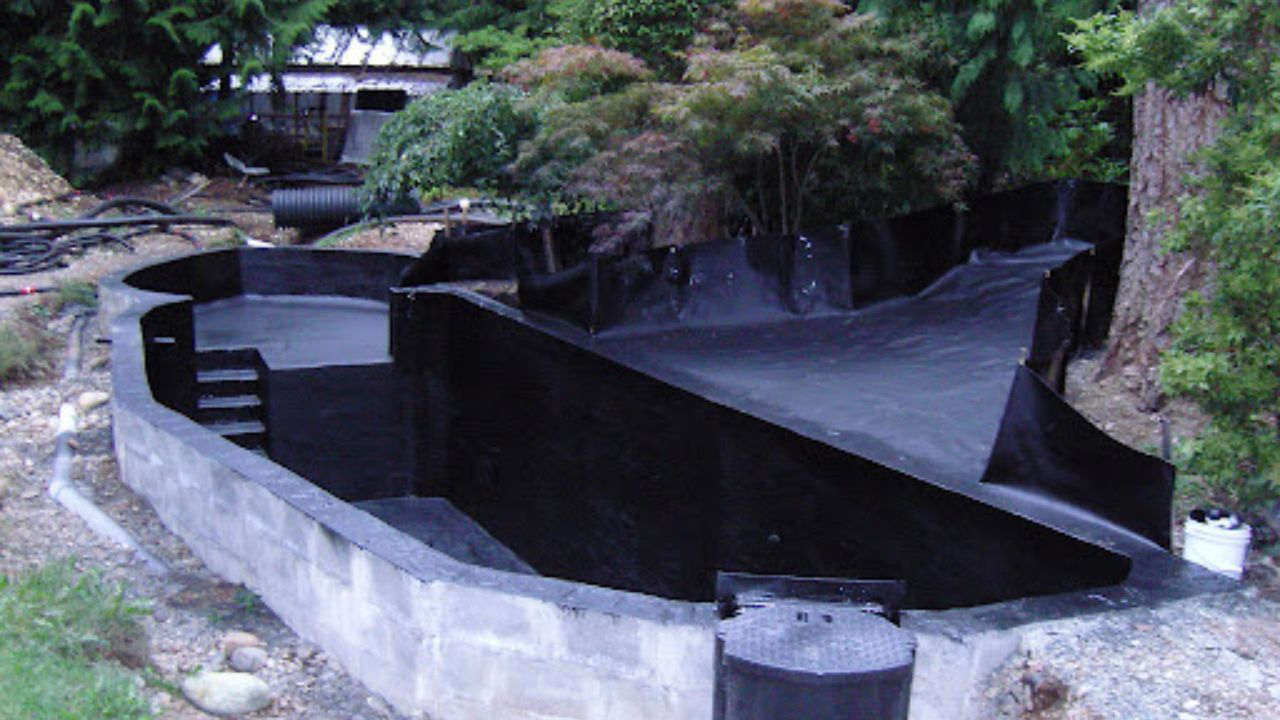
Étape 2 : Excaver et construire la structure

- Creusez jusqu'au niveau final, en sculptant deux étagères : une à 40 cm pour les plantes marginales, une seconde à 60 cm comme « aire de repos » pour les carpes koï et le bol le plus profond au milieu.
- Compactez le sol et installez des barres d'armature ou du béton projeté renforcé de fibres si vous êtes dans de l'argile ; la polyurée a besoin d'un support stable.
- Terminez par une couche de crépi lisse, sans bords tranchants. Considérez-la comme la toile de fond de votre revêtement par pulvérisation.
Un drain de fond relié à un filtre d'étang Poposoap alimenté par gravité rendra l'élimination des boues presque automatique une fois que les poissons s'y installeront.
Étape 3 : Préparation de la surface et pulvérisation de polyurée

- Apprêtez le béton durci avec un apprêt époxy approuvé par le fabricant.
- Masquer les filetages et les bords de la plomberie.
- Chauffage et pulvérisation : les pistolets en polyurée fonctionnent à 60 °C et à 150 bars. Ils sont conçus pour une épaisseur de 2,5 à 3 mm pour les applications sur carpes koï.
- Passe visuelle : un éclat brillant sans trous d'épingle signifie que vous avez terminé ; la membrane se gélifie en 10 secondes et atteint un durcissement praticable en moins d'une heure.
Étant donné que la polyurée se lie chimiquement, toute réparation future implique la pulvérisation d'une nouvelle couche ; les couches se réticulent en une seule peau monolithique.
Étape 4 : Intégration de la plomberie et de la filtration
Filtration en boucle fermée
Déposez un filtre de bassin Poposoap à l'extérieur de la paroi de l'étang ; son pré-écran en acier inoxydable et ses mousses en couches interceptent les feuilles, tandis que les anneaux en céramique hébergent les nitrificateurs qui transforment l'ammoniac en nitrate sûr.
Mouvement de l'eau
Une pompe à cascade Poposoap (40 W) alimente le déversoir, restituant l'eau cristalline en une nappe scintillante – une boucle écologique qui oxygéne également l'eau. Pour une recirculation silencieuse la nuit, une pompe secondaire de faible puissance peut contourner la cascade et renvoyer l'eau directement par un jet immergé.
Augmentation de l'oxygène
Installez l' aérateur de bassin Poposoap . Panneau solaire le jour, batterie la nuit, il recouvre le fond de microbulles qui empêchent la stagnation. Par temps ensoleillé, placez une fontaine flottante solaire Poposoap au centre ; son moteur de 45 W projette des arcs décoratifs le jour et se met en veille lorsque le crépuscule diminue le pH et l'activité des poissons.
Étape 5 : Ajoutez les touches finales
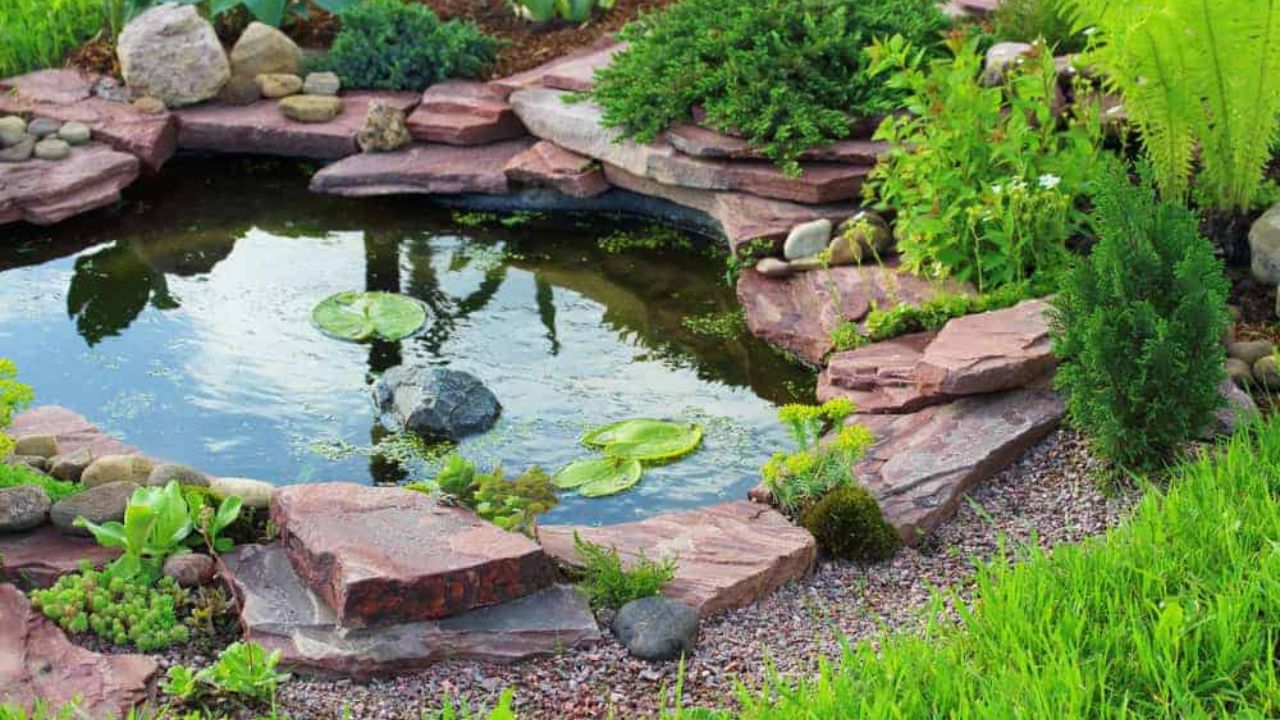
- Cachez les tranchées de plomberie avec du granit patiné ou du bois flotté.
- Nichez les paniers aquatiques dans le plateau marginal et ancrez-les dans la roche de rivière arrondie.
- Installez des lampes de bassin Poposoap RVB ou LED blanc chaud sous les margelles. Les kits solaires à trois têtes vous offrent 12 couleurs fixes ou trois niveaux de luminosité sans câble : passez en bleu apaisant pour le thé du soir ou en mode arc-en-ciel pour les fêtes du week-end.
Étape 6 : Introduire les koïs en toute sécurité

Remplissez le bassin, déchlorez et faites fonctionner les pompes pendant une semaine tout en dosant les bactéries nitrifiantes en bouteille. Testez quotidiennement l'ammoniac et les nitrites. Lorsque les deux niveaux sont à zéro, faites flotter les sacs à poissons pendant 30 minutes pour que la température soit à la même température, puis relâchez-les et ne nourrissez pas pendant 24 heures. N'oubliez pas : les premiers mois de construction d'un bassin à koïs polyurée ne concernent pas la nourriture des poissons, mais la nourriture bactérienne.
Étape 7 : Conseils d'entretien pour les bassins en polyurée
- Inspectez une fois par an : la polyurée forme rarement des cloques, mais une inspection rapide vous permet de repérer les bords soulevés autour des cloisons.
- Rincez les tampons filtrants chaque semaine dans l'eau du bassin. L'ordre grossier-fin garantit que chaque tampon dure des saisons, et non des semaines.
- Taillez les lis avec précaution. Les matières végétales mortes sont de l'ammoniac en devenir.
- Vérifiez les disques de la membrane de l'aérateur tous les six mois ; remplacez-les lorsque le motif des bulles s'affaiblit.
- Mode hiver : Dans les zones de gel, limitez la cascade et comptez sur la fontaine solaire Poposoap ou l'aérateur pour maintenir un trou de respiration - la polyurée résiste au gel et au dégel, mais les poissons ont toujours besoin d'oxygène.
Étape 8 : Aperçu des coûts et considérations
| Composant | Coût typique (USD) | Notes |
|---|---|---|
| Excavation et obus (DIY) | 600 $ à 1 000 $ | Varie selon la taille/le sol |
| Pulvérisation de polyurée | 10 à 15 $ / pied carré | Comprend un apprêt |
| Kit cascade Poposoap | 180 $ à 250 $ | Pompe + déversoir |
| Filtre de bassin Poposoap | 220 $ à 350 $ | Taille jusqu'à 660 gal ou plus |
| Aérateur Poposoap | 120 $ à 160 $ | Panneau solaire inclus |
| Lumières LED pour étang | 90 $ à 140 $ | Ensembles solaires ou AC |
| Koi et plantes | 200 $ et plus | Des échelles infinies |
Le polyurée n'est pas le revêtement le moins cher, mais sa durée de vie (plus de 20 ans) signifie que son coût par saison réduit les remplacements répétés d'EPDM. Ajoutez les pompes économes en énergie et les accessoires solaires de Poposoap et votre facture d'électricité à long terme reste modeste.
Étape 9 : Conclusion + Produits Poposoap recommandés

Que vous soyez un amateur de jardinage ou un entrepreneur professionnel, la construction d'un bassin à koï en polyurée vous offre un bassin sculpté et homogène, résistant aux racines, aux griffes et aux rayons ultraviolets. Associez ce bassin à :
- Kit cascade Poposoap pour un flux dynamique et un son relaxant.
- Filtre de bassin Poposoap pour une eau cristalline et un contrôle de l'ammoniac.
- Fontaine flottante solaire Poposoap pour ajouter de l'éclat pendant la journée sans alimentation électrique.
- Aérateur d'étang Poposoap pour une assurance oxygène 24 heures sur 24.
- Lumières d'étang à LED Poposoap pour faire passer l'ambiance de la lumière du jour au théâtre crépusculaire.
Chaque module respecte le principe « sans outil, sans tracas » de l'entreprise : loquets à pression, boîtiers en ABS et joints robustes. Vous pourrez ainsi profiter de vos week-ends avec vos carpes koï plutôt que de vous battre avec la plomberie. De l'excavation aux finitions, ces quelques choix judicieux transforment le béton brut en une toile vivante, colorée et animée. Commencez à pulvériser, à circuler et laissez les carpes koï effectuer la dernière étape de décoration dans leur nouveau palais en polyurée.
Laisser un commentaire
Tous les commentaires sont modérés avant d'être publiés.
Ce site est protégé par hCaptcha, et la Politique de confidentialité et les Conditions de service de hCaptcha s’appliquent.